Friday, October 16, 2009

Mom's Lunch Part 2

Well after 2 days of preparation I believe I pulled it off! The table was set, the weather was beautiful, no one got lost, we started with 12 but the flu took it down to 10 guests and what a bunch of gusty gals!  My mom is in her 60's, widowed and more active then ever. Card clubs, travel clubs, social events, you name it, so this was one of her groups and they do lunch once a month and always try a new restaurant.   This month it was Cafe' Debbie.  I made fresh from my garden, Bruschetta and Brie with a honey and dried cranberry topping for appetizers with baguettes. I had the menu posted there so everyone could see what they would be HOPEFULLY enjoying. 
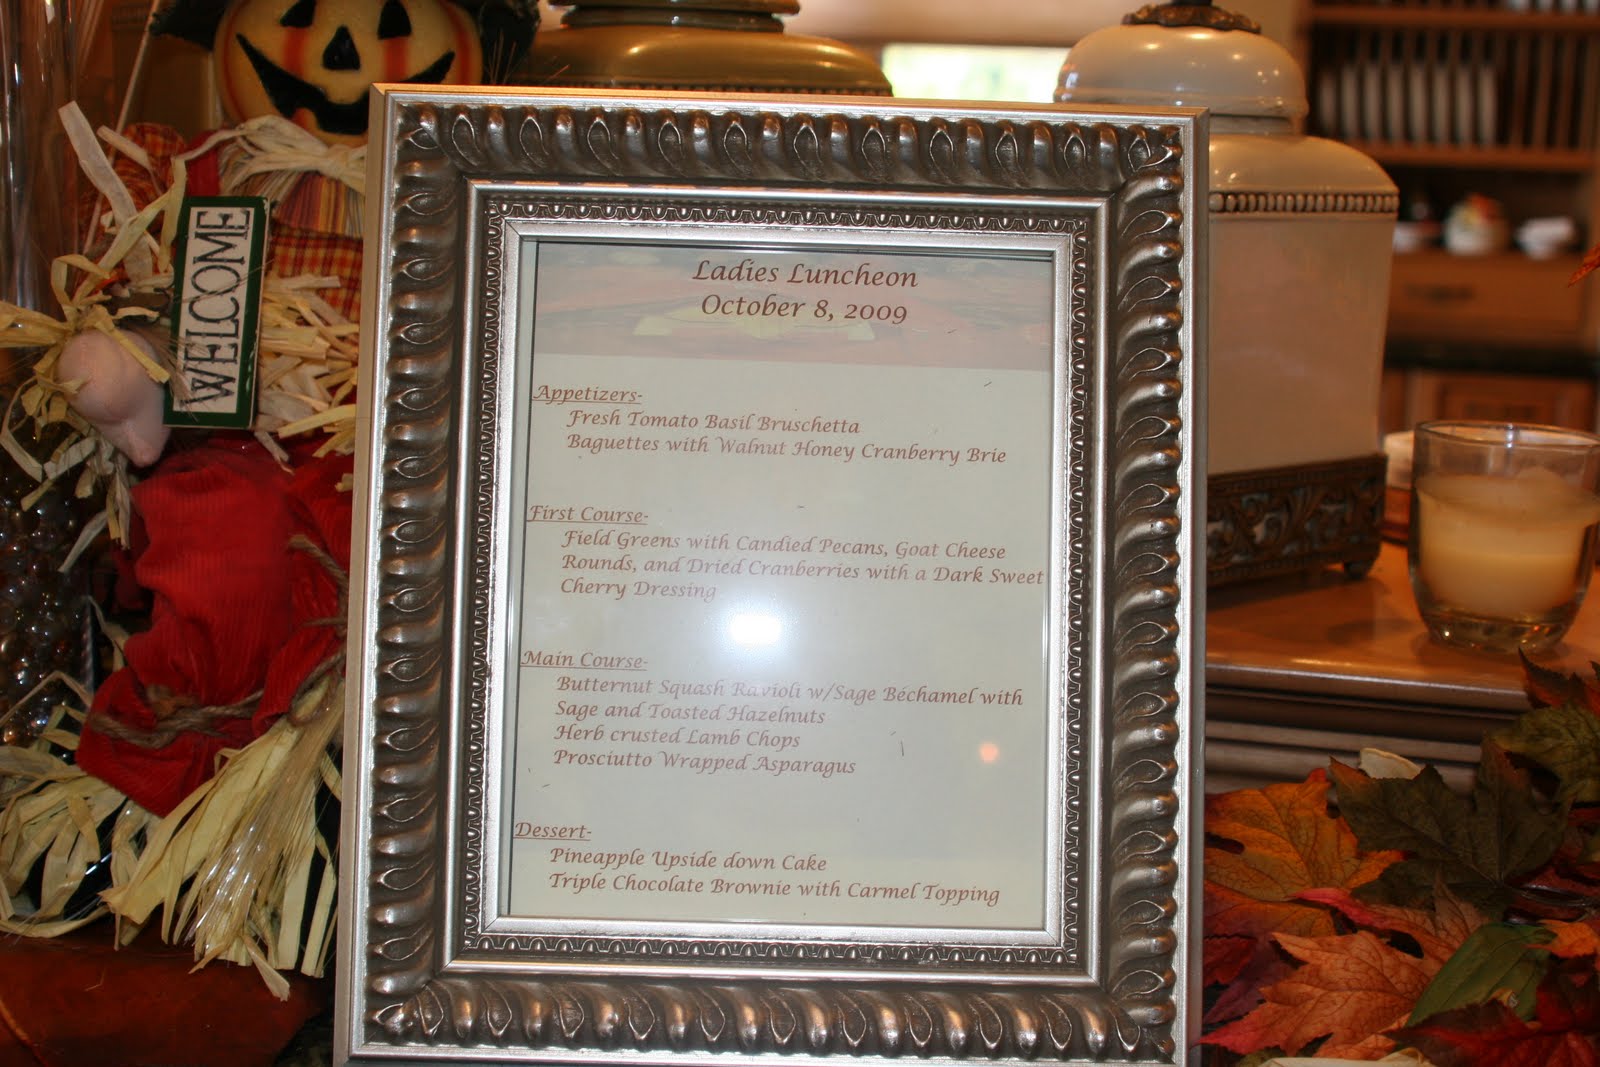

Let me talk about prepping for this.  I am not a caterer, I have had many caterers in my kitchen, so I tried to take my cues from them, but WOW, it is hard work, especially on your own. But if I were to give advice to anyone who wanted to attempt a party like this there are things to consider.

  1. When choosing your menu, keep in mind food temperature.  If you are alone in preparation and serving, can you do it all and get everything out while still warm?
  2. Portions, how many of what do you need and count on a bit extra for flubs or requests for seconds.
  3. Anything you can do ahead, DO! I toasted my baguettes the day before and froze, only had to warm them in an oven. Marinated my lamb chops, and made all my raviolis the day before.
  4. I try to make notes to myself on timing, I usually work back from the time the event is supposed to begin and decide how long I need for each thing and write down the times I should be starting each dish.
  5. On the day of, make sure you calculate 2 important times into your time table, time for kitchen clean up  and body clean up! It is great to spend all that time making a beautiful event but if dishes are piled up and you smell, it sort of defeats the purpose!
  6. Remember little details matter! Candles, flowers, I like to try to always provide a take home memory, it's the little things that set you apart and makes the event EXTRAordinary! One simple one-the day before my party, I slice lemons very thin, lay them on parchment or silpat on a baking sheet and freeze. These perfect frozen lemon wedges are now your ice cubes in your water glasses.

Needless to say, I had great intentions to photograph each plate but didn't have the time, so here you will see the dessert plate.  I couldn't decide between chocolate and fruit so I did both, I did my famous easy brownies, which is a box mix brownies and when you take it out of the oven use a wooden dowel and poke holes in the brownies and drizzle sweetened condensed milk and then a good quality jarred caramel sauce and let cool before you cut.  It is ridiculous!  For the fruit dessert, I decided on a pineapple upside down cake.  I have a great recipe given to me by a friend that I will post in another entry, but I wanted to make them individual servings so I used a large muffin tin.  One pineapple ring fit right into the bottom of each one, it was perfect. I put some of my caramel sauce in a squeeze bottle and made it look decorated! Super Easy and looks great!

Well another successful event down and I was so relieved it went well!  On a side note, I would like to remind any and all of you out there that whoever you consider to be an older generation to yours, pay attention!  These gals that came to my house, were all my mom's generation -60's and up.  They all had great stories to share and plenty of tips to pass along.  They were a terrific bunch of women and I admire all of them for getting out there, being active, having fun and enjoying life. You know the old saying, the youth is wasted on the young, HA these women prove it all wrong! They are living their lives to the fullest, lucky ladies!  Until next time....


Friday, October 2, 2009

Throwing a luncheon for Mom

So in order to throw the perfect party, whether it be large or small, I feel it is crucial to know your audience. I always try to find out if my guests have extreme dislikes, allergies, dietary restrictions and/or strong preferences. Once I have all the information, I can start formulating my menu. After many years of doing this I have my methods to do this in an organized manor. I start out with my menu page and on the side bar I use it as my shopping list.  If my menu is complicated I will also make a time frame just so I do not loose site of what I need to do and when I need to get it done by.  There is nothing worse then serving cold food or going to all the trouble of creating a special meal just to realize you forgot that one crucial ingredient.
Creating the menu is another issue altogether.  It is all about pleasing your guests, maybe trying to come up with a theme or pick a country, you know Italian, Mexican, etc... Try to make sure the courses compliment each other or don't overlap, for instance I wouldn't do a corn chowder and then a corn side dish to the main dish, unless of course corn is your theme, then be my guest.  Finally, if the meal was heavy, consider a lighter dessert and visa versa.
Ok on to the table, I like to use the season as my guide, but there are other items I might consider as well.  Is it casual or formal?  Do you want to match the theme? Will it be a buffet or will food be on the table? I am in fall mode, trying to will it to come so my table is decorated accordingly. I tend to really dress my table, I like for my guests to come in and see the decoration.  By the time they sit to eat, the extra decorations are gone from each setting. I also like to designate seating when I have a large party. It helps to alleviate any awkwardness about who to choose to sit by and lastly I always have the menu posted, either at each individual place setting or one for the table.  I love it! I think guests are impressed at the personal touch and I usually find people like to know if they should save room for something. Lastly, I do like to make sure the guests leave with something to remember their experience.  Sometimes it is simply a special chocolate in a box, bottle of wine or a little goodie bag of assortments.  Other times we try to match the gift to the theme, a lemon theme may have a small bottle of homemade lemoncello or lemon square. A personal get together may have a group photo in a cute frame or recipe from the meal on a decorative card.
Let me close by giving a bullet list of tips and ideas-

  • A cool idea for a water glass, the day before, slice citrus fruit very thin and freeze on a sheet tray. Use as ice cubes for the water glasses.
  • Try to match a glass of wine or cocktail to compliment each course.  There are many sites to get info from, but your local wine shop will be helpful too. This can really add to the experience.
  • Always make sure you have a non alcoholic choice for drinks.
  • Pick the plates you will use for each course ahead of time.  If it is salad plates,chill them, and be ready to get the hot plates warm ahead of time.
  • Low volume background music or entertainment is very nice especially if there is a lull in the conversation, it isn't quite as quiet.
  • This sounds silly, but I am a total freak about this one.  Check your bathroom, make sure there is plenty of tp, tissue, soap and the trash is not full.  This seems so obvious but it is often overlooked
  • If butter is being used at all for bread, make sure it is room temperature.
  • Remember, you do eat with your eyes first so try to make the plate look as appetizing as possible.
  • As far as cooking goes, I like to do as much ahead of time as possible.  I chop veggies, make vinaigrettes, anything that can be done ahead of time.  A salad can be made by putting the dressing in the bottom of the serving bowl, then criss cross the salad tongs, then add the lettuce.  The tongs keep the lettuce from touching the dressing and not getting soggy. You can toss right at the last minute. I purchased small condiment bowls awhile back so I can use that to put my chopped veggies, garlic, whatever it is in there for a do ahead task.
Ok so yes, I am a freak! I love to entertain! I love to find interesting ways to do things. (I use little rock salt chunks with a scraper at the table instead of a shaker.) I love to cook and fortunately I think I do a pretty good job of it.  Although I have my moments.  A couple of years ago, I was entertaining some very important clients/friends and my in-laws.  They were wandering around the outside showing our guests the outdoors.  My son was inside, helping me put together my mini blt appetizers.  I had just lit the candles on the table and sent my son to fill the water glasses when all of the sudden he ran out of the house screaming for dad, saying there is a fire. Why he didn't stop and say this to me is still beyond me.  I ran to the table to find the whole center of my 150" table on fire with flames shooting up a couple of feet. My husband ran in the house, grabbed the fire extiguisher and was ready to blast my BEAUTIFUL TABLE! I screamed NOOOO and threw water on it and out it went. We removed the charred centerpieces and my husband, wonderful guy that he is, went outside and clipped some pretty branches to cover it all up. Our guests were so kind and understanding and we ended up with a beautiful dinner. So all this in mind this is my last suggestion. Photograph your table before your guests come.It is wonderful to remember each table you have done, that way you don't copy (unless you want to) and you see flaws that should be fixed.  Upon looking over my pictures of that table THE NEXT DAY, I noticed that some of the folliage I had on my table was right over some of my votives, hence fire!  Moral- look at the picture before the party to spot your flaws before they happen! I hope my tips help you have a great entertainment experience!

Friday, September 25, 2009

Sundays

Sundays, well what can I say? It is my most and least favorite day of the week! No sporting events to attend, only ones to watch.  No work, no school, usually no homework to nag about. It is the day that belongs to each of us to make of it what we desire, but somewhere around 3:00 the realization of Monday begins to creep in. It is like being on vacation and knowing the only thing left of it is the packing and traveling. Total bummer.

In any case, on one such Sunday, I decided to do something creative.  My idea of creativity is creating something edible.  Sometimes it is my day to make chicken stock to freeze up for future uses.  When my garden is in full swing, it is making a beautiful roasted tomato sauce that I can freeze for a future use or making a pesto before the basil goes to flower and seed. On one recent Sunday, I decided that a homemade ravioli was in order. I have a really wonderful pasta dough recipe that is heavy on the eggs, but it makes a nice firm ravioli which I like, holds up very well in the end.


Pasta Dough

Makes about 1-1/2 pounds

3 cups all-purpose flour
7 large egg yolks plus one whole egg
1 teaspoon kosher salt
1 teaspoon extra-virgin olive oil or other flavored oil if desired ( I use a garlic flavored avocado oil)
1/4 cup water
Bench Flour

In a food processor fitted with the metal blade, combine the flour, yolks, salt, oil, and 3 tablespoons of the water. Process until the dough begins to hold together. Stop the machine and pinch a piece of dough: If it feels too dry, pulse in up to 1 tablespoon more water, until the dough forms a moist ball.

Turn out onto a lightly floured work surface and knead until it forms a smooth ball. Loosely wrap in plastic wrap and let rest at room temperature for up to 1 hour before using. (While it is resting, this is a good time to set up your work area and make your filling)

Filling Recipes and Directions

I have two favorites, cheese and roasted butternut squash.
Cheese Filling-
15 oz container of ricotta cheese (my favorite brand is PollyO)
1- 8oz bag of shredded mozzarella cheese
1- 8oz bag shredded Italian blend cheese
1/2 cup shredded Parmigiano Reggiano
1 large egg, lightly beaten
1/4 heavy cream
1/4 - 1/2 tsp nutmeg
2 tbsp basil, chopped
salt and pepper
Combine all these ingredients, salt and pepper to taste.

Butternut Squash Filling
Heat oven to 425.  Take 2 butternut squash, cut down the middle, scoop out seeds, brush with vegetable oil, salt and pepper.  Place cut side down on a baking sheet and put in preheated oven.  Cook for about 30 minutes, till tender - a knife or fork can go thru with ease.  Take out till cool enough to handle.  Scoop flesh out into a food processor bowl.  Add to the bowl one 15 oz container of ricotta cheese, 1 8 oz bag of shredded mozzarella cheese, 1/2 cup shredded Parmigiano Reggiano, 1/4 - 1/2 tsp nutmeg, 1/4 tsp cinnamon and 1 tsp chopped sage. Process till smooth, if it seems dry add chicken stock, water or vegetable stock, a couple tbsp at a time till smooth.  Taste.  The squash should be somewhat sweet, but depending on how ripe it was it may need a tbsp or so of sugar added.

To prepare your workspace try to designate a section of counter top space for the process, in one section lay out a towel, preferably flour sack cloth, but any cloth towel will do. Lightly flour the cloth. As you make your raviolis, you will place them there to dry. You will need a small dish with one beaten egg and a pastry brush and a tablespoon for your filling, a cutter for the dough.  You can go fancy with fluted edge rollers or as simple as a tin can you took the top and bottom off of and cleaned well. I wuse a biscuit cutter. Personally, I like about a 4 inch round. You will also need to roll your dough out, either by hand or machine.  I have a machine, there are attachments for your kitchen aid mixer, or hand crank pasta machines.
Separate your dough into 4 pieces for easier management, making sure unused dough is covered in plastic wrap at all times. Take the first  of 4 and press down to make flat enough to go thru your pasta roller at the largest setting.  Roll thru and fold in half lengthwise and roll thru again, then move your setting down one size and do it again, no need to repeat, unless you are getting uneven sides or holes. Repeat till you are at the smallest setting.  Lay your sheet out and cut as many rounds as possible. Take one half of each round and put one heaping tablespoon of filling in it, take the other round and brush with egg wash. Place on top of filled side, I like to put it in my hand at this point and press the edges together, making sure to get as much excess air out as possible and sealing as well as you can. Place on your prepared cloth.  Repeat until you have used as much dough as possible.  I like to take the extra shreds of dough and let it dry, then throw in a ziplock bag into the freezer for future soup noodles. As you are preparing your raviolis, as you finish one of the 4 balls of dough, lightly dust the tops of the prepared raviolis with flour and then flip them, the idea is to let them dry a bit.

Bring the water to boil in a large pot.  When at a boil, salt the water, then add the raviolis, careful not to crowd the pot.  Reduce the heat to keep it at a gentle simmer, if it boils too hard, the raviolis will come apart and you will have empty pillows.  They should take about 5 minutes, they will start to raise to the surface.

As for toppings, the easiest thing to do is to melt butter in a skillet, throw in some fresh herbs and and then dust the top with some fresh shredded cheese.


THE DIP THAT MAKES YOU DIP!


Give this one a try! I will add a picture later, but I was reminded about how great this recipe is and how popular you will be if you make it and share!

Ingredients:
2 bars of cream cheese
Pace Picante Salsa (whatever heat level you want) – but I do not use the chunky one I use the original one.
1- Chipotle Chile
1/2 -1 cup of shredded cheese
one bunch green onions, chopped
1 med tomato, chopped
1 avocado, chopped
opt- 1/4 cup cilantro – chopped
opt-1 jalapeno, minced
Directions:
I put the cream cheese in the food processor ( it helps too if it is room temp) and blend till creamy. I add the salsa a bit at a time, I am more interested in consistency, but I will guess it is about a cup. You want it creamy and not too liquidy, although it does firm up a bit in the refrigerator so you don’t want it to be so firm that you wont be able to get a chip in there. With the processor running, add one chipotle chile and a little of the adobo sauce too( you find them in the hispanic food area called chipotle in adobo sauce). If you wanted to add a little more heat then you would add the jalapeno now too.Open your processor lid and toss in cheese, I either use the Sargento Lite Mexican Shredded cheese to lighten things up, or sometimes for a kick I use Shredded Pepper Jack and/or this Chipotle White Cheese (I have only seen this at Costco and it have a neat smoky taste without being too spicy) and the chopped green onions,. at this point you would also add the cilantro if you were using it. Place the lid back on and just pulse till mixed through. You don’t want to loose the texture of the onions and cheese. Take it out and place in your serving bowl, cover with plastic wrap. Doing this part early in the day is a good thing, gives it plenty of time to firm up and have all the flavors come together. When you are ready to serve, you can garnish with the chopped tomato and avocado. Serve with chips, cut veggies, crackers, anything dipable!
VARIATION -
Take extra large flour tortillas, spread the dip on the tortilla about 1/4 – 1/2 inch from the edge, top with the avo and tomato. Roll the tortilla fairly tightly. Get some sturdy paper towel and just dampen, you don’t want them wet, lightly dampened. Roll the paper towel around each tortilla roll and place in a sealable plastic storage bag and place in the refrigerator for at least 1 hour. Just before you plan to serve, unroll the paper towels and slice the tortilla rolls about 1 inch thick. Serve cut sides showing, and you can have some extra salsa on hand for dipping too if you want.

Thursday, September 17, 2009

SImple, Delicious Lamb Chops

One of my favorite things to make-LAMB CHOPS!! They are so easy and tasty and I have gotten great reviews.

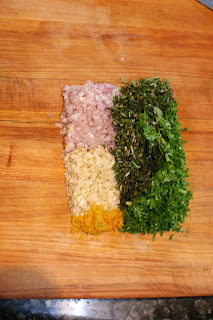
The first thing I do is to chop like a mad woman! I am so fortunate to have land to grow fresh produce on, and I have beautiful herb beds. The first thing I do is to pick fresh rosemary, sage, basil, oregano, and italian flat leaf parsley. I chop it fine, then on to the shallot and garlic, again chopped fine. Lemons are the next order of business. Zest first and then save for the juice. So all those chopped items go into a dish for marinating. To that you add the juice of 2 lemons, salt, pepper and oil. I prefer avocado oil, but any neutrual oil will do. I usually make enough to fill a canning jar and use enough to cover the chops and store the rest in the refrigerator.

I haven't been specific about amounts, and I am a do it by touch and feel, but I will say that each herb should be about 1/4 chopped. I use 2 or 3 shallots and I use one whole head of garlic. 2 lemons and about 1 1/2 - 2 cups of oil.

Now put those racks of chops in the dish you are going to marinate in and add the marinade. Rub it in really well. I like to put the chops fat side down into the marinade and then rub into the back side. Cover with plastic wrap and refrigerate overnight.

DAY 2 -
Take your dish out up to an hour before you are going to cook, to bring to room temperature. I like to use a cast iron skillet, but any skillet will do and I heat it - SCREAMING HOT! Then put those chops fat side down, into the skillet, turn and try to get as much searing as possible. We are just trying to get a nice sear on the outside of the chops and get it heating. While you are doing this, have your oven preheating to 325 degrees. Once you get a sear on the chops put them in a roasting pan and put them in the preheated oven for about 15 - 20 minutes. Take them out, let them rest, covers with foil for about 10-15 minutes.
If I am having a dinner party I will get to this point and stop, get everything else ready and then at the last minute finish. I take the chops to a cutting board and turn back on my skillet. Cut through the chops to seperate them into individual chops. I love a little sear on the sides, so depending on how done you want them I throw them cut side down into the skillet to get a sear. If you like them rare, just down and flip and out, if you want them a little more done just keep them in the skillet a bit longer. Salt and pepper them before serving if you would like.
I have served these as appetizers, and as a main course with risotto and asapargus.
GOOD EATING!!

Sunday, March 8, 2009

Chicken Stock


So my weekends are usually crazy, but when I get the chance I make a long simmering, rich and flavorful chicken stock! I cut up an onion, garlic head, and a shallot. Then I cut up a cup of carrots, celery and leeks, throw them in my beautiful huge stock pot. To that I add my chicken bones. Now here is the the thing, I hate waste, so during the week, I may roast some chickens or use store bought rotisserie chicken. When I do that I always save the bones, throw them in a storage bag and throw it in the freezer for stock day! Even the day I made Hoisin Wings, I threw the end pieces of the wings into a bag and added them to my pot. It is a great way to use a chicken completely. I will have roasted chicken one night, use the leftovers for chicken salad the next and then use the bones for stock that weekend.

SO once you have your veggies and chicken bones in the pot, add a couple of bay leaves, parsely stems, fresh thyme a tbsp of peppercorns and top with cold water. Bring it to just a boil, not a hard boil just a good, steady simmer and be ready to occasionally skim any gray foamy stuff off the top. Other then that thow, I just let it go! I turn it to low and let it simmer for a few hours, no stirring just skimming every once in a while.
At the end of a few hours, I taste it to make sure it has that herbal, chickeny rich flavor and I usually salt it at this point, just to taste- a bit on the weak side to leave you some room for further seasoning at the point of the end use. I ladle it into another stockpot thru my chinois to fully strain off the broth and then put it into the fridge overnight. The next day I skim the fat off, so now it is is virtually fat free! I put it into either storage bags or storage containers and put into the freezer for when I need it! It is too simple - just try it!

Hoisin Wings!!

So last Sunday was Hoisin Wing night, a favorite here. Thought I would post the process and the results.

The key to an excellent wing is, in my opinion, proper marniation time. I like to prepare my sauce early in the day so the wings can swim in the sauce for 8 hours, turning them about every couple of hours.

First you need to prepare the garlic, cause what is a great anything without garlic? I like to do a rough chop then toss a bit of kosher salt on top and mush with the side of a knive to form a paste. Once that is done I add to a large bowl and add in some chopped ginger. Sometimes I use fresh, but the jarred version works fine in this case.

Next on the agenda is the lime juice, fresh squeezed from one or two. Now it is time to add the hoisin sauce, I use one jar of my favorite brand. I believe it is about 8 ozs. which would equate to about a cup. On top of that you need chinese hot sauce, oh about a tsp to a tbsp, depending on your tolerance of heat in food. Next is Ketchup, about 3/4 cup, and on top of that, about 1/4 cup of Rice Wine Vinegar, salt and pepper and thats it! Sweet, Spicy, Tangy, Savory, TERRIFIC!

Now it is important to bathe those wings for those 8 hours. I use the party wings, which are essentially a wing that has been cut at the joint and the end of the wing removed. You can easily prepare them yourself, or buy them already done for you. Either way the smaller piece makes for a terrific bite size piece!
Once the wings fully bathed and ready to get the heat treatment, let them out of the referigerator for a bit, maybe half hour, to come to room temp. Then on the grill they go! AND CHECK IT OUT!