Friday, March 12, 2010

Meyer Lemons, Liquid Sunshine!

What is a Meyer Lemon and what makes it so special?  Well from a technical standpoint, a Meyer is thought to be a cross between a ture lemon and a sweet orange.  From a culinary standpoint, it is quiet unique and special.  You get the tang and acidity of a lemon but not with the same punch as a typical lemon, so something you would typically use a lemon for, you can sub in a Meyer lemon and get a terrific brightness, but with a sweetness too.  I have spent alot of time experimenting with this fruit to devise ways to highlight its unique qualities.  Here are some things to try should you come across this hard to find fruit!

Meyer Lemon Simple Syrup
1 cup sugar
1/2 cup water
1/2 Meyer Lemon juice
zest from 1 or 2 lemons
Heat over med high heat till sugar is disolved. Strain into a container and store in the fridge.  Use to make a martini, lemonade, or sweeten your tea.

Meyer Lemon Herb Vinagrette
1 Shallot, minced
1 tblsp Dijon Mustard
1 tblsp Honey
1/4 cup Meyer lemon juice
zest from 1-2 Meyer lemons
1 tblsp finely chopped, each of Basil, Rosemary, Oregano, and Flat Leaf Italian Parsely (any combo of those would work)
1/2 -1 cup oil, I prefer avocado oil but canola or Olive oil will work too
Salt & Pepper

In a bowl, whisk together the shallot, mustard, honey and lemon juice.  Let stand for about 5 minutes. I do this to allow the shallots to mellow out.  Now add in the zest and finely chopped herbs, blend well.  Begin to whisk and slowly add in 1/2 cup of oil till blended and emulsified.  Check for taste and consitancy.  Everyone likes their salad dressings a bit different, I am usually fine right here since it makes for a lighter calorie choice, but at this point you can also adjust your sweet/sour levels.  Sometimes your Meyers will be sweeter then others so this is the time to check, adjust, salt and pepper, a pinch of each and serve or store in a jar in the fridge. The obvious use is for salad, but try this, roast potatoes in the oven and when they are nice and crispy and ready to take out, pour some of the vinagrette over them, about 1/4 cup and toss well, put back in the over for about 5 minutes to heat thru, and serve.  DELICIOUS!

Tangy Garbanzo Bean Salad AKA Fiber Bomb Salad
Salad
3-14 oz cans Garbanzo Beans drained and rinsed
5-6 garlic cloves, minced
1 jalepeno pepper,seeded and minced
1 each yellow and red bell pepper, seeded and chopped
1 bunch green onions, chopped
1 bunch fresh cilantro, chopped
Zest from 1 or 2 Meyer lemons and one lime
Dressing
1 shallot, minced
1 tblsp Dijon Mustard
1 tblsp honey
1 tblsp Cumin
1/4 Meyer lemon juice
juice of one lime
1/2 cup vegetable oil, (again I prefer avocado oil)
Salt and pepper to taste

Combine all the salad ingredients.  Combine all the dressing ingredients except for oil then slowly whisk in the oil.  Add the dressing to the salad and toss well.  Referigerate for about 1 hour to let all the flavors marry. 
OPTIONS- Sometimes I add one or all of the following ingredients.
1-28 oz  can of green beans.
1 fennel bulb, diced
3 chopped roma tomatoes
1 lb package of whole grain pasta, cooked

Make it your own!  It is loaded with fiber and vitamins and it feels so fresh and bright with all the citrus, it is a perfect addtion to any meal!

Well I hope that you try some of these recipes, you can also sub in a regular lemon in any of these applications, but you will probably need more sugar or honey to mellow it out.  Just remember these lemon tips.
  • Anytime a recipe calls for vinegar, sub in lemon juice and taste the difference
  • When making chicken soup, add a squeeze of lemon juice to add brightness without the sourness, (TRY IT YOU WILL BE SURPRISED)
  • Clean your copper pots. Sprinkle with salt and then squeeze with the juice. Clean gently and you will be amazed
  • Clean your cutting boards.  Lemon juice is a natural antibactierial agent. I sprinkle some salt on my board and take a cut half of lemon and rub my board.  The salt just makes for an abrasive to get into the nooks and crannies.  Rinse your board and if wood, oil lightly to keep the wood moist.
Remember when life gives you lemons, make MEYER LEMONADE!!

PS Meyer lemons will be available on our company website soon.  Visit us at http://www.spfarminc.com/!


Wednesday, February 24, 2010

Seasonal Fuel

I am a firm believer in seasonal and fresh ingredients, the challenge is to find the ones that are truly fresh.  Many of the items in your produce section may look pretty and shiny, and yet a bite or cut into it and you will see that this is not the case.  Many of our produce items have been specifically developed to be as resistant to the elements as possible, that way they can handle the cold storage for months at a time they might go through.  An apple you buy today, may have sat in a cold storage room for months.  I understand the economics of this, but the basic truth is food is the fuel our bodies require in order to live.  The way we create unique dishes, exciting tastes and eye pleasing plates, is the icing on the cake.  If we can for a minute just deal with the stripped down version of this and the fact that it is fuel for us, it will be clear that fresh and seasonal is in everyone's best interest. Once a fruit or vegetable is removed from its life source, its vitamin punch begins to degrade and of course the quality begins to degrade as well. If we are looking for the best case of fuel for us, then we would want to eat something that gives us the most nutrition as possible.  Use your computer to find out what fruits and veggies are being harvested in your local area and search them out, or ask your produce manager in the grocery store, although I am not certain you will get the help you really want because their job is to move product, not tell you that the apples you just put in your cart are a year old.

Now if you are lucky to find something fresh, but you can't use it right away, then, if this is a viable option, you should blanch it and freeze.  For instance, every year we plant English peas, a lot of them.  I harvest them about 3 or 4 times during the early spring and if I ate them all while they were fresh picked, I would turn into a giant pea.  What I do is I pick, shell, heat water to boiling and add a hand full of salt.  Throw the shelled peas into the boiling water, bring back to a boil and within a minute or two drain them and shock them in a bowl of ice water. Get a sheet tray and lightly spray with cooking spray and put the drained, cold peas on the sheet tray in a single layer.  Put it in the freezer overnight then the next day, put the frozen peas in a ziplock bag and throughout the year, you will have fresh peas.  AND the bonus point part of this is, the blanching process, then freezing helps to keep the enzymes from breaking down and allows it to keep more of its nutrients in tact. This is also a great thing to know when shopping for unseasonable fruit or veggies.  Buying frozen is typically a better way to be assured that the nutrients have been preserved.  Obviously not all items can be frozen, so be sure to not overbuy. It may mean better planning and more trips to the market, but your body will thank you for it!!

Wednesday, December 30, 2009

Time flies when your having fun?

WOW, I cannot believe it has been this long since my last entry, close to 2 months.  I so look forward to the holidays every year, and then just as quickly as I was looking forward to them beginning, I begin to wait anxiously for them to be over. This year, in particular, was more eventful then usual but completely self imposed!
We begin with Thanksgiving. Every year for as long as I can remember, we head to a sleepy little town called Bass Lake, California.  There we are eventually met up with the rest of my husband's brothers, wives, kids, friends, and parents.  We typically have around 20 or so total, so it is active and fun.  I elected myself chief cook in charge of the Thanksgiving meal.  I am getting quite organized, which is some times worse then being scattered, because I constantly do not trust that I am on top of everything.  Needless to say, I have lists, time tables, and do my best to prep ahead of time.  Here are some of my examples.
This shows my mise en place(basically prepped foods), all ready for their prospective applications.  I do this prep work the day before, label and place in the ziplock bags and use as needed. I make my mac and cheese the day before and the cranberry sauce ahead of time too. I like to unwrap, clean and leave my turkey open in the refrigerator the night before to dry the skin out abit (makes for a crispier skin).You can use fresh bread as well for stuffing, cut up and leave out overnight in roasting pan to dry out a bit, perfect for stuffing the bird.

The day of I like to use fresh veggies as the base for the bird rather then using a rack.  It keeps the bird from sitting in the fat and drippings, and adds such fabulous flavor to the drippings to make a really terrific gravy.  My vegetable base consists of carrots, celery, onion, garlic clove, a couple of shallots, bay leaves, and the crowning touch, fennel, which adds such a great sweetness and full flavor. I stuff my bird ALWAYS! I find this is a very midwestern thing, and being from Illinois I fit the bill. Stuffing is best in the bird because of the internal juices just add so much flavor. I do season the inside of the bird first before adding the stuffing, which is very a very traditional sage, butter, celery, chicken stock, onion and bread crumb stuffing  I chop fresh sage and blend with softened butter to put between the skin and flesh of the turkey then get ready to prepare the bird.
The actual recipe for the bird is a take off of a Martha recipe. Preheat the oven to 450F. You melt a stick of butter and about a half to full bottle of white wine and warm in a sauce pan till butter is melted.  Take cheesecloth and fully soak in the liquid. then cover the turkey with the cheesecloth, trying your best to cover the drumsticks and thighs.You roast the bird for a half an hour at the high heat and then lower to 350F for another 2 1/2 hours then remove the cheesecloth.  Cook for another hour or so, looking for 165F internal temperature. While cooking I do baste maybe every 45 minutes or so, and if I am short on liquid I use a bit of chicken stock.  I also use the neck of the turkey and usually purchase addtional necks, wings or turkey legs and place in a pot with onion, garlic, celery, carrot and water to let simmer for the day to make a flavorful stock for the gravy.

Once the turkey is done, I try to get out the stuffing right away and put into a oven safe dish. Cover the turkey lightly with foil to rest for about a half and hour and while that is happening use some of the pan drippings to moisten the stuffing and then put in a 350 oven for about 20 minutes to heat thru completely. As soon as possible I move the turkey to a cutting surface and cover and then I strain off the pan drippings so I can make the gravy, which I do in a seperate skillet.  I draw a couple of tablespoons off the top of the pan drippings, which is the fat and use that with a couple of tablespoons of flour and heat in a pan till blended and just coloring. Whisk in the  rest of the pan drippings, less as much of that fat as possible, the stock that you have been simmering all day- to total about 2 cups and bring to a boil which will cause it to thicken. Salt and pepper to taste, you will be pleased with that extra something special that fennel adds.

I feel after all these years I have the turkey thing down ok,  I have all sorts of things to try, brining, low temp cooking, frying, the usual suspects, but this method seems to do ok and produce a moist turkey.  HOWEVER, if you find your turkey to be a bit dry(it is very difficult to get cooked dark meat without drying out the white meat) then take your roasting pan, now empty and put enough chicken stock or remaining turkey stock to cover the bottom of the pan.  Place the cut turkey in the roasting pan and cover with foil.  If you are worried that it is getting to cold, the oven should be off but still warm , put the roasting pan in there, keep the door cracked.  You don't want to cook the meat more, but you do want to keep it warm. The addtional moisture really does help to plump up a turkey that may have gone a bit past, and no one is the wiser. 

The best advice I can give is don't give up.  Every year you learn more, you see what worked and what didn't.  AND I feel more important then the turkey is the cranberry sauce, gravy and mashed potatoes, because no matter how dry or flavorless your turkey may or may not be, if you succeeded with the sides, no one will be the wiser.  TRUST ME! 

Tuesday, November 3, 2009

BALANCE and the Zig Zag Workout

This is a post that is not a recipe or about food, well maybe not about but because of it. Balance is a very important thing in life, and it has only taken me 46 years to realize it. If you love to cook as much as I do, you must balance that with activity.  Sounds obvious doesn't it?  All things great in theory, don't always equate the actions they intend, but this year I have made conscience efforts in this area, ACTIVITY.  I though I would share my journey, my thoughts and my ideas thus far.


So you can go out and spend thousands of dollars on the equipment, like my elyptical trainer and my treadmill. I think I spent less on my first car then I did on those two pieces of equipment! Don't get me wrong, the are terrific , but the realization hit when I went for a walk with my husband and after months of 5 or 6 days a week, 45 - 60 minute workouts, HIGH impact, and the first hill I took I thought I would DIE! And the moral of that story is there is no replacement for the ACTUAL thing, and bonus points, vitamin D, fresh air and commune with nature a bit. Think of this this way, our bodies are a well manufactured machine, and if you think about all the investments we have made into them, food, clothing, shelter alone, we could have bought enough machinery to fill 100 gyms, so why not work on that investment, our own machine using our own machine to improve it! 


I am very fortunate, I live on a 100 acre avocado and citrus ranch.  There are endless grove roads and combinations of trails to take, hills and flat areas. And yet it still becomes a bit monotonous so I started to experiment and I think I came up with something fun that anyone can do anywhere.  I call it the zig zag. The zig zag is really just that, instead of walking a straight line you zig zag your walk, for every step you would have taken forward, depending on the width of your path, you take extra steps by zig zagging.  There are some advantages to this, first of all you can have a shorter distance of a walk and still get the steps in, you work different muscles by the pivots you make, if you are going up or down hills you can cut down on the grade, which for me and not so terrific knees, is a bit of a relief.  I also do a zig zag that is like a side step, which causes you to push off and work your inner thighs too. Now the downside, people think you have been nipping at the eggnog, but I don't care, it makes it a little more interesting.  


In any case, finding balance in my life is a never ending quest, as I am sure there are many who join me in it. Juggling family, business, and whatever else gets thrown in our direction tends to make me feel like a baseball player waiting for the perfect pitch, wishing I had someone giving me signals to give the heads up, but then again, sometimes the fun is more in the quest then in the destination!


So get out there, find some balance in your life with the zig zag!

Sunday, November 1, 2009

Good ole Cheesy Mac n Cheese


This one is for Kim, my other lobe! I do a mac and cheese for Thanksgiving every year and it truly satisfies all walks, meat eaters, ketchup lovers and vegetarians! I have been doing it for so long by taste, touch and site, I had never really written it down, but my family will be thankful today, since I decided it was time to write the recipe and the best way is to make it and measure as I go along, So here goes!

CHEESY MAC 'N CHEESE
1 1/2 pound of macaroni noodles (6 cups dry)
1/4 cup butter (1/2 stick)
1/4 cup flour
4 cups liquid, I like 1 heavy cream and 3 of whole milk
1/4 tsp pepper ( I prefer white pepper only because it doesn't show in the sauce)
1/2 tsp dry mustard
1 tsp nutmeg preferably fresh grated
pinch cayenne
8 cups cheese of your choice
optional bread crumbs (or toasted bread cut up in small croutons)
1/4 cup grated Parmesan

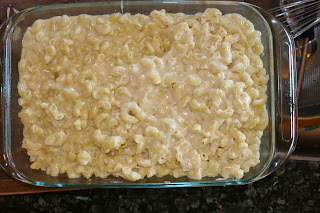
Prepare the macaroni according to the package directions, but be sure to err on the side of al dente or just under fully done, it will be recooked when the mac and cheese is baked and you don't want it to be a mushy noodle.  Strain and set aside.  In a large pot, I like to use a small stock pot, melt the butter over med high heat, when it is just about melted , add the flour and turn down to medium and use a whisk to mix together, it should be a bit more liquid then a paste.  The key is to cook the floury taste out of the flour and get a little color, the technical term here is we are making a roux, a light one.  It should be the color of lightly toasted white bread.  At this point I add one cup of the liquid, whisking the whole time.  It will start to thicken and as soon as that one cup is incorporated, add the rest of the liquid and whisk, whisk, whisk.  You know the thing I think that is missing in cook books are instructions that we can relate to if we have never done anything like this in our life, or the "why" of what we are asked to do.  So I am trying to make sure I give those explanations.  Why you whisk is you don't want it to burn on the bottom of the pan, and milk products will scald and it is not an attractive flavor for mac and cheese, BUT you must bring the mixture to a boil or it won't thicken properly, so it is important to give this mixture your full attention. The technical term of this sauce is a bechamel and it is a mother sauce, used often as a base to create other sauces just like the one we are making.  Once it is bubbly and thickened, turn the heat to low, keep that whisk handy, and add in the spices, whisking after each addition.  Make sure it is fully mixed and turn off the heat.  Add your cheese and now you want to stir with a wooden spoon or a rubber spatula works well.   Stir to make sure everything is incorporated.  It will be thick and cheesy.
I like to add the noodles to my pot, but if your pot isn't large enough, put your noodles in your casserole dish and pour the cheese sauce over. Either way, mix the noodles with the sauce well and get into your casserole dish.

Now here is where you can get creative.  You can sprinkle the Parmesan on top that simple or you can do the cheese and breadcrumbs, or breadcrumbs and the cheese, either way dot with a bit of butter or drizzle with a vegetable oil before baking.  The other way to go is to cut the crusts off of half a loaf of white bread.  Toast and then cut into small crouton shape.  Spread Parmesan cheese, spread croutons and then dot with some butter or drizzle oil before baking. You can also add a couple tblsps of truffle oil to the mac and stir well before toppings.
As far as the baking process goes, it is 375 degrees for about 40 minutes, covered with foil for 20 minutes and uncover for that last 20.   Cook until bubbly and lightly browned.
Lets chat about cheese.  There are many choices you can make. and 8 cups can give you so many choices of combinations.  My combination of choice goes like this.  I like a Gruyère for its nutty flavor, fontina for its creaminess, monterey jack for the melty, sharpness, a sharp cheddar for its nutty, sharp flavor, romano for the sweetness and the Parmesan for the salty nutty flavor.  I use the first 5 for the cheese sauce and the last for the top.  However, I have done many different cheeses.  When I am doing this for a kid party, I use cheddar, mozzarella and Velveeta cheese.  Sometimes I do a lower calorie version so I use the shredded lowfat cheeses.
A couple of notes. You notice I added no salt in this recipe.  I am a firm believer in tasting, the problem is you can taste this thing all along, but the Parmesan is pretty salty so I am concerned about telling anyone to salt, but here is the thing, I salt the bechamel before adding the cheese.  I add about a tsp of kosher salt.  If you taste the sauce before the salt and then after, you will see how the salt accentuates all the spices you added, however, it is really easy to over salt so IF you decide to try to add salt at this point, maybe go 1/2 tsp or even a 1/4 and as you go along and make this recipe again you will know it was too much or not enough.
My final note is the additions you could make if you really wanted to.  To the point that the sauce is the cheese sauce, you could add green chiles, bell pepper and/or some of your favorite salsa for a spicy southwestern kick, also sub in some pepper jack cheese for some or all of the cheese..  You could saute ham or pancetta and add that to the cheese sauce for really unique flavor.   You can really cut back on calories and substitute some of the liquids for chicken stock.  Add some fresh herbs to the bread crumbs for a really fresh take.  The bottom line is don't be afraid of trying new things. It is only food, doesn't work out, do it a different way next time.  No one is perfect and no one does it perfect every time, so trust you instincts, and make sure you are tasting as you go.  Remember, strong flavors, like salt, pepper, mustard, they can all get a little stronger with heat, so be sparing, you can always add after cooking.
Give it a try and let me know how it is goes!  Good eating!

Sunny in California

Funny, games are being rained out, snow in the Rockies, but here in Southern California, we are touching the 90 degree mark. I still have tomatoes and peppers in my garden so it was a good day for a cool, refreshing Gazpacho! This is my garden and you can see the beds are sparse but there is still some things going on in there.
So I thought I would share this recipe because it is so easy and delicious and you can take it and add, subtract whatever you want to give your own twists.
GAZPACHO
2 cucumbers, peeled and cut into a dice
1 cup of diced carrot
1/2 of a large red onion, diced
2 bell peppers,. diced you decide on the colors you like
3 stalks of celery, diced
4 cloves garlic, minced
1 jalapeno, minced
1/4 cup smoked sweet paprika
1 tsp fresh ground pepper
2 tbsp sherry vinegar
2 tbsp Worcestershire Sauce
1 - 2 tbsp horseradish
5 - 10 dashes of your favorite hot sauce.
1/4 fresh chopped parsley and basil, combined
1 bottle of your favorite tomato juice or vegetable juice, about 8 cups
good drizzle of you favorite Extra Virgin Olive Oil

Cut up all the vegetables so they are the same size, I like a 1/4 to 1/2 inch dice and mince the garlic and jalapeno really small, you want the flavor not to take a bite of them, you could even grate them if you like. Put them all in a container that you can cover, add the remaining ingredients except for the tomato juice, herbs and oil. Let the vegetables sit for about 15 minutes to let all those flavors sit together.  Add the tomato juice and herbs, stir well, cover and refrigerate. It is best to let it sit overnight so the flavor can fully develop. Give a  nice big drizzle of your olive oil and stir. Taste and then decide if you want more pepper or if you want to add salt. Serve as is, with crusty bread or really great with bbq'd shrimp!


Some of the variations include adding fennel, chopped fresh tomatoes, avocado or jicama.  Some of the traditional approaches include adding a couple of slices to the juice before adding to the vegetables and place it in the blender to add some thickness or adding some of the chopped vegetables to the juice in a blender for the same purpose. Another interesting addition is popcorn!  Try this one anytime, it is FABULOUS

Friday, October 23, 2009

Dark Sweet Cherry Dressing


Ok Laura this is for you. I make this very wonderful dressing that is easy to do and always gets a great response.
https://blogger.googleusercontent.com/img/b/R29vZ2xl/AVvXsEiF4uHT9wyn4wies8iBj646g1HVNOVvWypfZ5a40uFSTfRrSTxU28iigkQBGkBPTOE3n_Ppx4urfPIEBPYOInth85sJnfMP0DTR_EpdNBTTRxII28kLiM1qoZHZ0yL4dyehiWHvPxTPyN1q/s1600-h/dressing1.JPG1- 12 oz jar of Cherry Preserves (strawberry works well too)
1 cup balsamic dressing, I use a cherry flavored one
1/2 - 1 cup of brown sugar

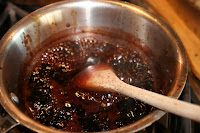
https://blogger.googleusercontent.com/img/b/R29vZ2xl/AVvXsEgqMbiuqPcr3dK_ul30fDXoFwrp9alJyDHaGRHWULylI6ghrRPRKNP23wTMLIonTvem8Zbe2l_36uHefiU_vrVfiH1tkycuknyNAF2rNyGXNX9MqERjpCGEuNI1K-lPKTWlQIxPMFwOH3F3/s1600-h/dressing2.JPGPut the preserves, balsamic and 1/2 cup of brown sugar in a sauce pan, a reduction sauce pan if you have one.  Bring to a boil and then turn your burner to low and keep it at a simmer, stirring often,  for about 1/2 hour till reduced by about a cup, it should leave you with about 1 - 1 1/2 cup liquid. At this point, taste - carefully cause it is hot- to check the sweetness level.  You want to have a bit of tartness, but this is it so make sure it is not too tart to have on a salad.  If you decide to add sugar stir and cook a bit longer just to incorporate, and then turn off the heat and let it cool. As it cools, it will thicken to a syrupy consistency. At this point, you can use it (see below for a suggestion) or put in a container and store in the fridge for later use.

As a suggestion for a use, I usually get some field greens, washed and dried well.  Take a tablespoon or so of some good quality oil, I prefer avocado oil, but a good quality Extra Virgin Olive Oil will do and dress the greens.  Add a pinch of salt and pepper and using the tools that God gave you and get your hands in there and toss well. At this point I like to add some cheese, my favorites are creamy Gorgonzola or a Cambozola  cheese, but the last time I did this salad I took a roll of goat cheese and sliced it into 1/4 inch slices. I like the contrast of sweet from the dressing and the pungency of these cheeses.  If you like the goat cheese idea here is what  I did.  I dipped it into a store bought bread crumb and coated completely. I melted a tablespoon of butter and about a tablespoon or so of oil and just browned the slices and put on a paper towel to remove any excess oil.  Now back to the salad, I love to use candied nuts, pecans for me. Now for the drizzle of the cherry dressing.  Use enough to make sure you get the taste in every bite.  If you did the goat cheese, put your round on top at this point and time to eat!

Ok Laura so I thought about your problem, which was the dressing was so thick and it is true it is thick like a syrup or jam.  I have added it on my salad in spoonfuls after being dressed with the oil and then allowed each person to sort of toss it all together, but last night I had a thought. I took a couple tablespoons of the oil in a dish and added the dressing and stirred till it was fully incorporated, it took a while but it did thin out the dressing to make it more spreadable.